2021 Summer Project: A New Home for the Hens!
Hi! Facilities Manager here! Yes, writing again. This time with exciting information. Well, it's not edge-of-seat stuff, but it is good news, especially if you have feathers and live on the northeast corner of our two acres of heaven here at Chickadee Gardens.
For several years we've dealt with the flaws of my first chicken house. We wanted three or four hens at the time and it seemed to work well for that number, but then Sweet Pea the turkey joined our family and other hens came along. So with eight hens and a large, awkward turkey bird, it was time for something larger and more accessible.
When a hen laid an egg in the old cube -- it is 4' x 4' x 4' in size, which I thought was clever at the time -- you had to lean inside so much that you usually fell into the straw, the chicken-poop infested straw. After a few years, the inside of the cube was dusty, itchy and not great. So, as I do, I decided my Summer 2021 Project would be an improved hen house. Here goes:
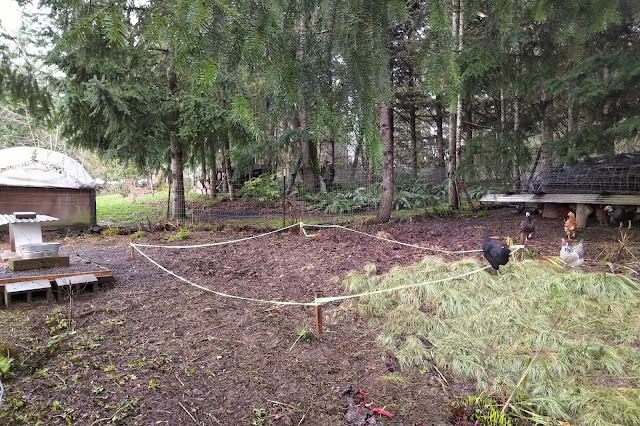
In February I staked out the site. The hens tried to help, but their scratching usually resulted in felled posts and tangled plastic tape. I had an idea of how I wanted the new hen house to look, but details were somewhat vague. It developed as it came to be.
Now this is a Case of Poultry Assistance at its best. Of course, I had to dig out - with a shovel, mind you -- the foundation base. Sweet Pea and the girls decided to help. Certainly, it was for worms and bugs.
The cinder-block foundation and the flooring joists came next. Note hens to the upper right. At this stage I was working inside our chicken yard, so they helped with everything. I often found them doing the balance-beam walk on the 2x6s.
Please pardon the blurry photo, but I want to be sure to thank our friends Gina and Raoul for giving us several sheets of plywood/osb board and three large cabinets. Also, about 20 sheets of Styrofoam, most of which I donated last week to the local Habitat for Humanity store here in Saint Helens. I did use about six sheets of it for the floor of the new coop, however. Thank you, Gina and Raoul!
Here is the old hen house, aka, the cube, and the adjacent chicken pen, which was covered with poly to provide the hens with a dry place on cold, rainy days. Remember when it used to rain?
The cube was cute, but I know Tamara disliked the color. Immensely disliked the color. Sigh. She eventually covered one wall with a nice jasmine.
This is the first framed wall. I constructed the four walls on our flat, paved parking area, which is also at our garage where my tools live when not in use. Much easier than dealing with dirt, gravel, uneven ground and those oh-so-helpful chickens!
In this action shot, Hobbes passes the three doors and the other materials eventually used on the new hen house. I give Tamara a big "Thank you!" for letting me store this stuff here in our main walkway into the house as I awaited the dry months.
The floor installed and sealed with primer. It is a sandwich of plywood with Styrofoam in the middle. I figure it will help keep the hens and turkey dry and warm(er) this winter. It makes for a nice, soft floor in there.
Meanwhile, back at the framing area, our boy Hobbes is supervising. Not much help, Buddy. But he is so handsome, and feeling much better. He is 16 now, and any time he helps is a blessing.
I confess I freaked out about moving the framed walls to the site. I asked my neighbor to use his new green tractor. We discussed it, but determined it unsafe. I nearly hired some bulky high schoolers to simply carry the four walls over to the site. Then, one day, I realized that I often drive loads of compost and wood chips through the property, well, why not simply load up the walls and . . . !
Neighbor Mike helped to lift and hold walls in place as we put things together. I was a proud builder this day. Oh, and, yes, I moved the fences so the hens would not be helping at this point. They served as a superior audience, please know. Lots of clucking of good advice.
I wrapped it in poly film to prevent as much moisture invasion as possible. I swear . . . . it does rain here.
A poor picture, but I installed the roofing trusses, which, I should mention, my dear, 85-year-old mother helped me to build in early June. Thanks, Mom!
Here are the roofing panels. These sheets of osb were backed with 2-inch Styrofoam sheeting. Odd to me, but it should prove to be excellent insulation for the metal roof. My very strong and agile friend Bobby assisted me in placing the panels onto the roof. It was not easy, for sure. Thanks, Bobby!
You can see the roof panels and my two very large double-paned windows on the front (or south) side of the building. I scored at the Habitat store on these windows. Twenty dollars each. And they allow in an enormous amount of daylight. Love them!
Here's a good shot of the Delta-rib roofing, which I purchased at North American Metal out in Banks, OR. Nice folks out there. I wanted a new roof because we plan to stay here the next 50 years or whenever it rains again, whichever comes first.
And here is the big surprise. Our house -- the one we live in -- not talking the hens here -- is clad in corrugated metal siding. We loved it on the real estate site when we bought in 2015 and we love it still. We had a stash of extra siding, so . . . I put my brain in gear.
Yeah, it is fairly slap-dash and rustic, but it is exactly what I wanted, making sure Tamara liked it, too. She did (and does) so much that we seriously considered keeping it as a tiny house reading room or such for our -- the humans of the bunch -- for our uses. We discussed it for two weeks before letting that idea go. The hens needed a new home.
This is my favorite picture of the new house. The door on the east side, where the light is coming into the building, is a glass patio door that lets in so much early sunlight I doubt the hens will ever sleep late. Not ever.
I thank my dear wife for this idea. This is the nesting box. There are three nests under the lid, and it is waist-high for me, and about chest-high for Tamara. If you hear a hen announce a new egg, well, you simply lift the lid and reach in. Swa-eeeeet!!
Inside, this is their main entry door. I have since installed very thick vinyl flooring that I can remove and wash on a regular basis. No, I don't do that through that little door. I'll use the big glass door on the east end. Ha, can you imagine?
As two-thirds of the house is for the poultry, I separated the human part with a screen door and a wall. You can see the food bins in the corner. And way in the distance you can see our house, my inspiration for the new building.
I used a cable to support the main roost bar. Sweet Pea is a big fella, and this is his perch every night. I will report the hens and Sweet Pea were very confused the first evening when it came time to "come home to roost." But, over time, they are now ownin' the joint.
The finished hen house. I installed a metal lid on the nesting box. And I need to do some landscaping, but, all in all, all is well on the farm.
Oh, yes, this is the patio area for the hens when the storms come and they need a place to stand out of the rain. Their little entry door is back under this part of the structure. It remains to be seen if I need to install gutters.
There's the straw at work. And I think that is Frida posing for us. She is always photo-bombing someone somewhere.
We have yet to name the little building. I like "Huevos Rancheros," but that gains no traction here. Any suggestions? How about "The Hennery"?
Finally, we caught the girls and Sweet Pea in the act! The act of sleeping! Those crazy kids!
Well, that's the story of the new hen house. It was a very fun and pleasurable project. I am not a builder by trade. I had to really use my brain here, realizing that one must plan two to three steps ahead to ensure it comes out correctly. Of course, I had some goofs, but we are very happy with the outcome. I figure it took maybe 200 hours of labor and likely cost about $2,500 all told. The hens will have to lay a great many eggs for it all to pencil out. Haha!
That's it this week from Chickadee Gardens. Thanks to Tamara for letting me take over her blog. I wish you all well and some cool, wet weather ahead. Cheers, FM is out!


That is one snazzy hen house. I am sure Sweet Pea feels privileged to roost among em.
ReplyDeleteFM: You are correct, Lisa! Sweet Pea is our superstar. He's a real turkey, but we love him.
DeleteWowww, that is the coolest thing ever - great job! (People born on the 8th of July are really quite amazing humans...! ; ) )
ReplyDeleteFM: Stephilius! We July Eighteers should form a club with gold tie clasps and cufflinks. You in?
DeleteHow luxurious! Those chickens deserve it! And you have a turkey!
ReplyDeleteFM: Thanks for reading. I am installing the HVAC unit tomorrow! Haha, can you imagine?
DeleteThat is one impressive hen (and turkey) house! May the hens (and their progeny) live up to its promise by producing eggs with years and years and years. And I do hope you get rain again soon (along with us down in SoCal too).
ReplyDeleteFM: Thanks, Kris. So hot here the hens were in their underwear running through the sprinkler! Rain? I've heard of that.
DeleteLooking good. The hens and Sweetpea will be very comfortable in all that new space. Well done! How about calling their new digs (a combination of turkey and chicken) the 'Chuckey House'?
ReplyDeleteFM: Thank you. Do you mean "Churkey House"? Kind of close to Jerky House. Oh, I may as well call it the "Biltong House," if we are going to go that route. We'll just go Afrikaner on it!
DeleteE-peck construction story. More than that--eggs-trordinary. And that's no yoke.
ReplyDeleteFM: Whoa! Head exploding! Heehee. Thanks for writing, Hoover Boo. Always appreciate good eggy stuff.
DeleteFabulous! So glad those materials got some good use. Those are some very lucky girls and their Mr. Turkey too! Looks like it will be much easier to maintain, clean and collect eggs. (For even easier poop management, search for "hen house poop deck" on youtube.) Love that it matches the house...perfect! Can't wait to see it. Enjoy those eggs!
ReplyDeleteFM: Hi, Gina! Thanks for writing. I shall look up the poop-deck stuff. I am proud be have a "Gina Roof" to keep the girls (and boy turkey) nice and dry and warm.
Delete